entrance lottery entrance and What is it
minerOS is a free professional intelligent mining management system that is more stable, has higher yields, is easy to operate, and can be operated in batches, designed specifically for miners based on the Linux system. Ravencoin, abbreviated as: RVN, Chinese name:杜鹃币. The algorithm is X16Rv2, supporting N卡 and A卡 mining.
Mining Equipment: GPU (mainstream N卡, A卡 are both acceptable).
Operating System: Linux.
Mining Software: minerOS; Download Address:
You can obtain the RVN wallet address through the following link:
Wallet:
Exchange: Binance
MinerOS miner manager provides a total of 4 mining solutions: USB drive deployment, hard drive deployment, diskless deployment, and virtual machine deployment.
USB Drive Deployment: Suitable for first-time users of minerOS, learning how to configure local miners and cloud control panels, and getting familiar with mining templates, overclocking templates, and operation and maintenance templates. Recommended number of miners: 0-20 units
Hard Drive Deployment: After getting familiar with USB flash drives, if there is a hard drive in the miner, you can burn the system to the hard drive with a single command. The hard drive is stable and fast, saving costs and eliminating the need to purchase a large number of USB flash drives. Recommended number of miners: 50-100 units
Diskless deployment: Both USB flash drives and hard disks are cumbersome, and the cost is increased, use idle low-end computers to quickly install diskless servers, convenient configuration, local cluster management. Recommended number of miners: more than 100
Virtual machine deployment: No need to touch Linux, directly install a virtual machine in the win system, configure a diskless server, quick and easy to understand. vmware and vbox can be quickly deployed. Recommended number of miners: 100-250
This article mainly introduces the hard disk deployment plan, the USB flash drive deployment plan only needs to remove the third step, other deployment plans refer to:
Step 1: Download the latest burning tool on a Windows computer, insert the USB flash drive, and burn the system disk (ROM);
First, prepare a Windows computer, open the website www.mineros.cn and click Login/Registration in the navigation bar
Button, select Register Now, register a new minerOS account.
Then, click the product download in the navigation bar, download the burning tool, as shown in the figure below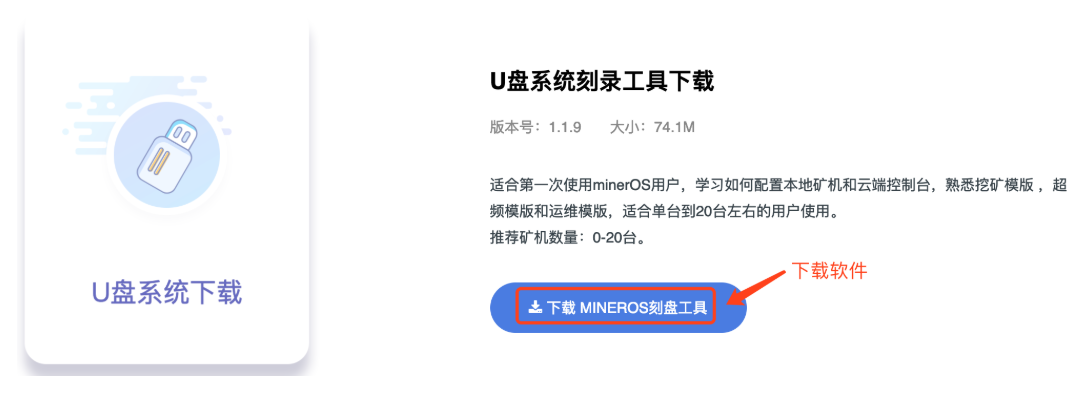
After installing the software, the software automatically pops up the burning screen Step 1:
Select the ROM version you need to burn, here are two options: new user burning and custom burningsports betting method and Just click to enter
New user burning (recommended): After selecting new user burning, you only need to enter the minerOS platform account you registered, after burning, insert the mining machine and it will automatically register (activate) the mining machine under your account, which is very simple and easy to use.
Custom burning: You can enter your private key (KEY), the KEY contains your account, but it is not displayed, give the KEY to the administrator of the mining farm to help you burn, and the machine will be automatically registered to your account.
After the selection is complete, click Next, new users burning will prompt to enter the account, custom burning will prompt to enter the key, proceed as needed.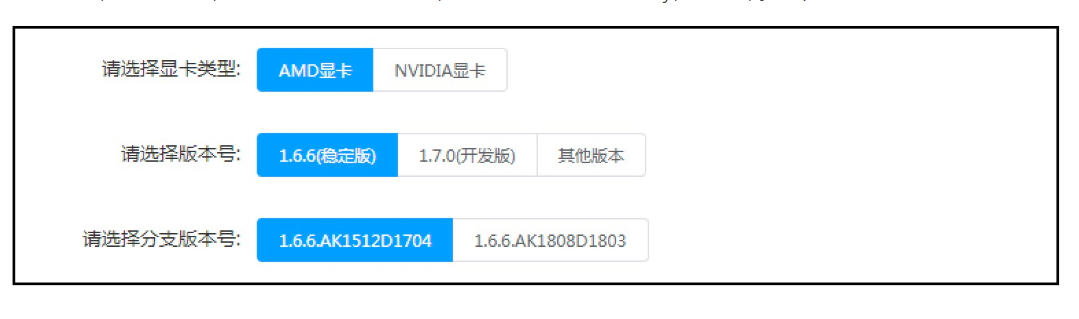
AMD card: Also known as AMD graphics card, commonly used cards include RX470/RX570/RX580/VEGA64, etc., you need to select A card
NVIDIA card: Also known as Nvidia graphics card, commonly used graphics cards include 1060/1070/1080/1080ti/P106/P104, etc., if you have these cards, you need to select N card;
Stable version: It is tested on a large scale, the version bugs are basically eliminated, stability is the first, recommended for new users;
Development version: It is the latest version, which has been released after internal testing, supports many new features, and may also support new currencies, recommended for experienced users;
Branch version: Generally, it is the difference in graphics card driver versions, the latest version of graphics card and stable version of graphics card, the burning software will put the recommended version in the first place, that is, the system’s default choice.
Select the required version, click Next, start burning, if you can see the USB flash drive, select the USB flash drive, if not, it is recommended to re-plug the USB flash drive, wait for about 2-3 minutes, and wait for the burning to finish.sports betting platform and How to find it
Step 2: Remove the USB flash drive, insert it into the USB port of the miner, set the boot to USB flash drive startup, turn it on, and pay attention to the following three points; please check them one by one.
USB flash drive startup: Remove the USB flash drive from the computer used for burning, insert it into the miner and turn it on, set the boot order, usually the mainboard is to press the Del key to start or press F12 to enter CMOS, set the USB flash drive as the first boot item, save the settings, and restart the miner.
DHCP enabled: Enable the DHCP function of the router in the local area network, so that the miner can obtain an IP address when it starts up. Many users have been using static addresses without opening the DHCP service, which causes the miner to be unable to work.
Miner startup: After the miner starts, it will take about 30 seconds until there is a Chinese prompt interface, indicating that the miner has started up normally.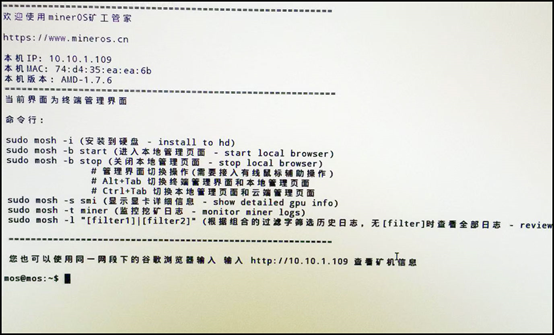
Step 3: Burn the system ROM from the USB flash drive to the hard drive and activate it under your account.
Firstly, make sure there is a hard drive in your miner.
1. Start burning the hard drive: Enter ‘sudo mosh -i’ and press Enter, note: sudo
There is a space between ‘mosh’ and ‘-i’, do not input it incorrectly; at this time, the system will prompt you to find the hard drive and want to burn the disk. Press ‘y’ to confirm, and it will take about a minute to finish burning. After pulling out the USB flash drive, restart the miner. The miner will boot from the hard drive and start up, and you will find that the boot speed is much faster. If the system detects that no unallocated disk is found, but your disk is indeed there, it means that there is another system installed on your hard drive, and you need to manually specify the hard drive partition to start burning.
For example: sudo mosh -i /dev/sda Enter, note that there is a space before and after -i.
2. Activate the miner to your account: Since the activation information on the USB flash drive does not pass to the hard drive, you need to manually activate your minersports betting tutorial and Latest. At this time, find the Windows computer that was used to burn the USB flash drive, confirm that you can access this miner (within a local area network), open the browser, enter the miner’s IP address you saw when the miner was turned on, and you will see the login interface. Log in with your registered minerOS account and click the key button (activate) in the upper right corner to activate this miner to your account.
Step 4: Log in to the cloud console, create a mining template, and load the template onto the miner to start mining.
Log in to the cloud console and configure the mining template to start mining.
Firstly, open the browser on a computer that can access the internet (Chrome browser is recommended), log in to the official website www.mineros.cn, click the ‘Console’ button in the navigation bar, enter your minerOS account, and log in to the console.
Select the mining template, click the blue ‘+’ in the upper right corner to create a new template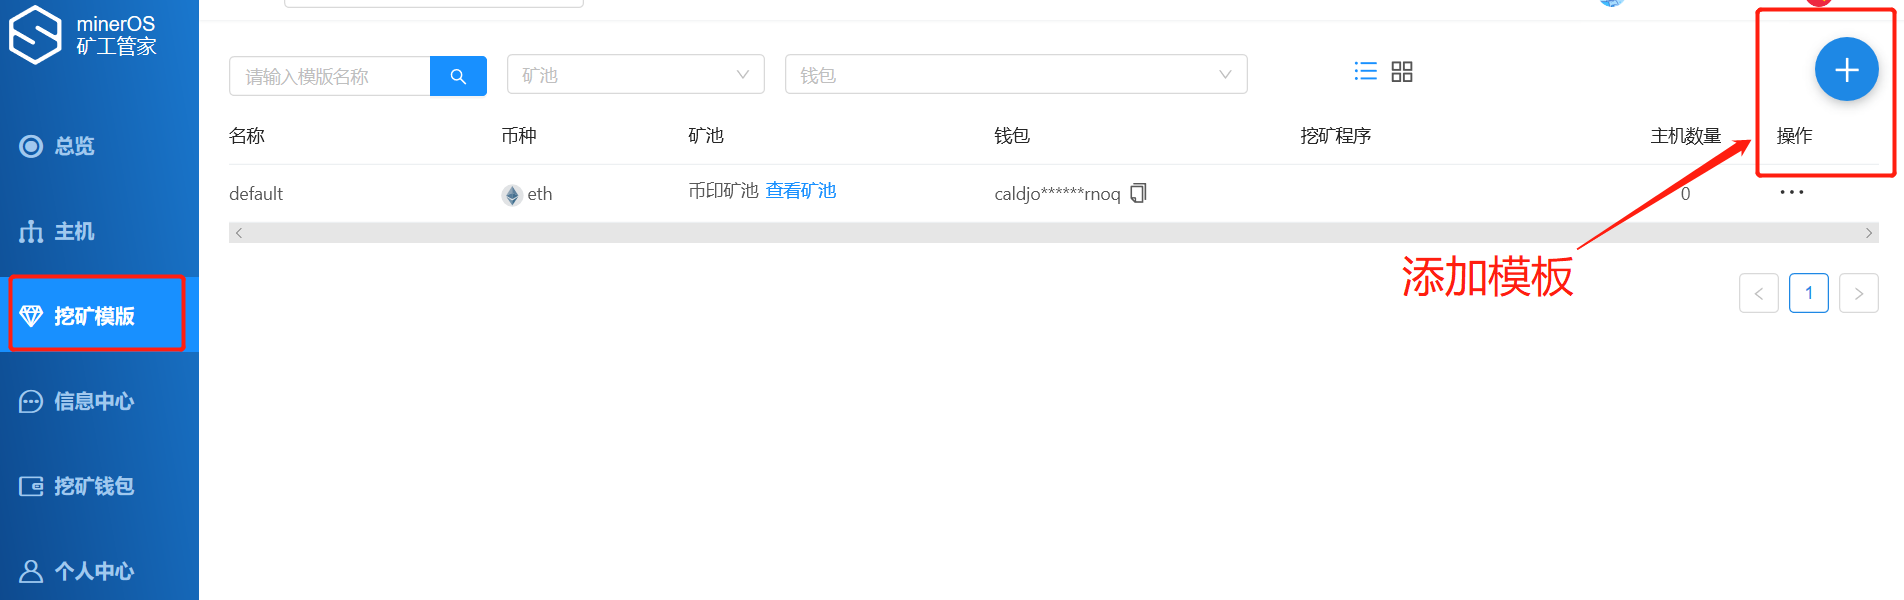
Then select the cryptocurrency you want to mine, such as RVN. After selecting RVN, proceed to the next step, choose the mining kernel you need, and then select the mining pool, such as entering the address of the BitMain mining pool, and then fill in your wallet. For the BitMain mining pool, you only need to fill in the sub-account name and you can click ‘OK’ to save.
Refer to the following examples.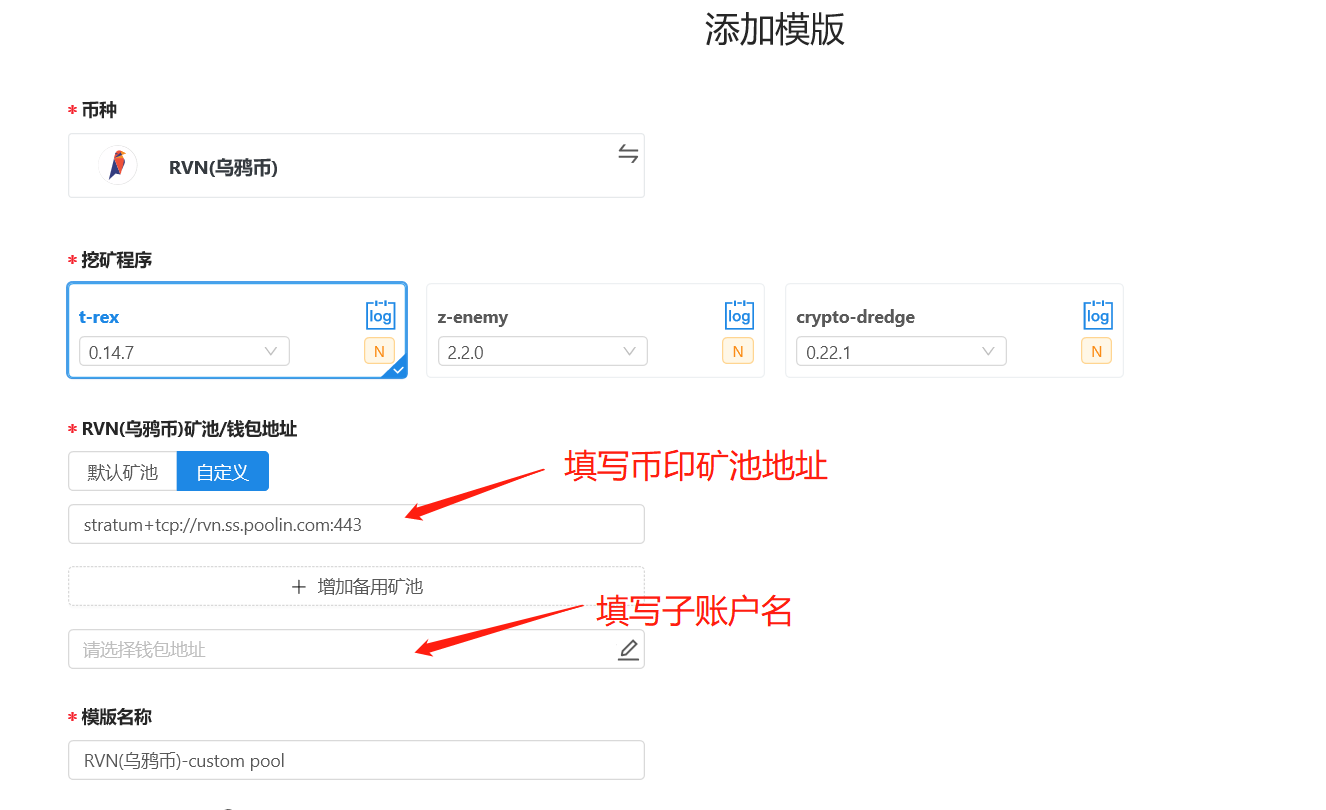
Detailed explanation of the terms involved in the template, and the content marked with a red asterisk in the template must be filled in.
Currency: This is the Online casino and How to find it you need to mine, such as RVN/ETH and other currencies
Mining Program: Usually referred to as the kernel, here is the important core of minerOS. Because the kernel of minerOS is automatically upgraded, if you find that the mining kernel has been upgraded, you just need to reconfigure the template, update it to the latest mining program, select the save and restart below, and the system will automatically update to the latest mining program.
Mining Pool/Wallet: Fill in the mining address and wallet address you need. The mining pool address of Coinprint is:
stratum+tcp://rvn.ss.poolin.com:443
stratum+tcp://rvn.ss.poolin.com:1883
stratum+tcp://rvn.ss.poolin.com:25
Template Name: The name of the templateonline casino local and The most exciting gameplay
Miner ID Prefix and Suffix: This is a very flexible feature. For a batch of miners, if you want to define it as ADS001A-ADS002-ADS003A such an order, then you can define ADS as the prefix and A as the suffix. You can flexibly group your miner IDs for yourself, and the middle 001 is automatically generated by the system in the early stage, and can be determined by yourself later.
Custom Parameters: Mining programs such as claymore have many flexible parameters, such as defining a card not to be used with the parameter -di 0123567
That is, the fourth card is not used, and you can add custom parameters here. If you are not familiar with it, it is generally left blank
Overclocking Switch: This is the overclocking part of minerOS, which is very important and belongs to advanced operations. If you are using an N-card, after turning it on, it will perform some safe overclocking by default, the parameters are very conservative, and it is turned off by default. If you want to study overclocking, you can see the advanced operation: overclocking tutorial
, the default is off. It is recommended that you keep the default closed state before you are familiar with overclocking operations.
Operation and Maintenance Template: One of the three templates of minerOS, the operation and maintenance template also belongs to advanced operations. It is recommended not to fill in by default.
After the template is established, you need to apply it to your miner, and your miner will start mining according to your specifications. We click on the host list
Select the three dots, choose the configuration and restart option, select the template you need and confirm, the miner will start working.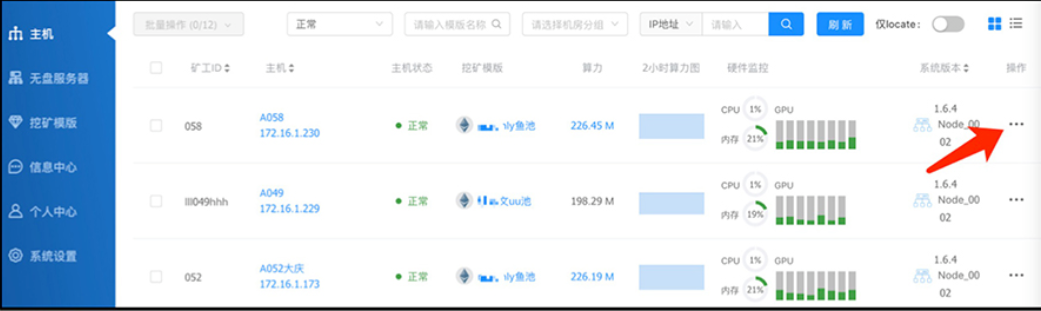
More Stories

